Search This Blog

Saturday, August 25, 2012

Tension Attention!

Many people have asked me about ...tension. 

If you have followed the manual instructions perfectly and still your stitch tension is off, from my experience here's how I adjust tension on my 257.


First of all, as you thread the machine, it is the utmost importance your thread is passed properly around the tension dial. To do so, you must put finger pressure (at the top right index finger) holding the thread down while pulling the thread over your left thumb (photo above) to place it into position. You want to make sure your thread is pulled tightly around the tension dial. You can continue to thread, as per manual instruction, the top thread. 


IMPORTANT!
The blue thread is position exactly where you need to feel enough pull from 
the tension spring before you put your thread into position.


Bobbin Threading...

Put your bobbin in counterclockwise. Note: The thread passing on top towards the left. Pass the thread into the notch and draw it left under the tension spring. Leave your sliding plate open and raise the bobbin thread by manually turning (gently) the hand wheel towards you. While holding the needle thread in your left hand. Keep turning the hand wheel until you see your bobbin thread appear through the needle plate. Now you are ready to do the first test.


This is the kind of Sample Test I love to do...

I make a straight stitch about 5-inch long for every tension number on a piece of lite double layer cotton fabric with two different thread colors. The Pressure Dial must be in the NORMAL position (even if your project needs to be sewn on DARN or MAX). In the sample above, I choose the black for the bobbing thread. The blue for the upper thread. The numbers correspond to the numbers on the Tension Dial.

Now, in a perfect world you want to have your Tension #5 to show a perfect stitch. From the top stitch you would barely see the bottom color showing between the stitch. And, from the back side you would see the Top stitch barely between the bottom stitch.

Obviously, it doesn't always happen this way. If your #5 looks like my #1 Tension, that means you need to adjust the bobbin tension. This takes time, turning the screw a little at a time and making a sample as many as you need. This could take a while depending on how much your tension is off. Look at the diagram (below) to help you...


If your tension is still off, it can be a combination of threading and tension. Make sure your machine is perfectly threaded.

Ok let's say you've reached nirvana and tension is perfect on your sample. Every time you start a new project with new fabric you'll have to make a little sample for your stitch tension. You obviously do not have to do the full tension test, but you will want to do 2 or 3 stitch lines, on your actual fabric, at different tension to see how it looks and adjust accordingly. 


I hope I help released your Tension about Tension!

Happy sewing!


Monday, August 6, 2012

Code Name: CURTAINS! Bon Voyage!

3 hands in plaid!


My old friend Jim, from art school, asked me to help him with his curtains for his Mitsubishi Delica van.

Now, I know how to make custom curtains. As a matter of fact, I made our curtains for our 1972 VW Van that I had with my partner Richard at art school back in the nineties.

The sewing part was easy the hard part was for Jim to figure out the way to hang to curtains. His van was not camperize. So he did it from scratch making his passenger van into a camper. Jim and Jen went to a fabric supplier and they suggested a plastic light blocker that is efficient but not pretty. It's used as a liner to be hung with another fabric as a curtain.


Jim says, 'This is a temporary rod system."


They were a little tight in their deadline and measurements. So, I suggested a plaid fabric that I could donate to their cause. The project code name: CURTAINS! was suppose to be cost as little as possible and be very quick to make and install.

Jim was over for an afternoon and while he was on the rod system, I was back and forth measuring then installing. It was challenging. I was working with pre-cut fabric. The vans' windows were all different sizes. We just had to make it fit. Considering the time we had, it looks pretty good and will work fine. I'm happy.

Jim and Jen are on their way across Canada then into part of the US, a month of well-deserved vacation. Jim assured me that when they return he may want something more permanent... ie less plastic!

Beautiful craftsmanship...
the open bed and side shelving!


Jim's special storage that goes under the bed...
What is he going to put here?

Sunday, June 24, 2012

BONNE FETE QUEBEC!


I'm proud to be a Québecoise...

I left Québec in 1988 to explore the west. To me, my plans was just to explore, to learn English, and eventually return back. Well it didn't quite work that way. I did learn English, met wonderful friends and I found love and stayed. Although I decided to stay in the west coast, every year on this day, I make a point to honor my roots by listening to Québec singers and raising my glass to all... Québecers.


BONNE SAINT JEAN BAPTISTE!


Friday, June 15, 2012

How To Keep Alive Your Fashion Mate 257

View of top & side sections exposed...


There's one device I always wanted on my Fashion Mate 257... a stitch counter.

I've seen this on electronic machines and it counts every stitch you make. It's fun. Like an old car with a speedometer that show's you the mileage. Of course, they never included this on the old machine but it would be fun to know how many stitches my old machine has accumulated over the last 40 years.

One things for sure, if you want your Fashion Mate working well, is to clean and oil it often. Afterall, it's all metal and rust is your enemy.

This is how I keep my baby purring!

Remove the two screws on the top plate and the one screw that holds the side plate. Remove needle and foot to gain better access. Your 257 will look like the image above.

Bobbin assembly removal: lift the locking arm with screw driver...


Then remove the back plate behind the foot. Lift the bobbin locking arm (black metal), gently with a screw driver (image above), lifting it aside to get access and to remove the bobbin assembly. Now, you are ready to dust. You can use a stiff paintbrush or I have found that there's nothing better to remove the dust than a little blow of compressed air. Note: because this area seems to hold so much dust and the paintbrush doesn't reach properly, the compressed air rules. Now, if I had the luxury of an air compressor, but I don't, I would use it. A can of compressed air works just fine. You only need a small amount.


When ONLY the Dust Off will do!


After you finish the dust off, remove the excess old oil and thread with a clean cloth. Make sure you rotate the wheel so you don't miss any hidden thread in the back. Now you are ready to oil.

I oil every moving part. How do you know? 

With the machine open (top plate off to access) and with light on, I start from the top of the machine. Press the pedal gently, and observe which parts are moving. Then stop and place a drop of oil on every moving part. Once this is completed, screw back the top and side plate. Now it's time to oil the bobbin mechanism. 

This is how your bobbin assembly should look...
Clean and Shiny!


Your machine should be looking nice and clean, put back the bobbin holder and plates back together. Press the pedal to make sure all the oil is distributed evenly throughout the mechanism. The bobbin assembly is the MOST IMPORTANT place to oil. If you don't have the time for an overall clean job, at least keep this area oiled at all times!


Looking under the hood.


At this point, you're almost done. The last step is to look underneath by tilting your machine and looking at the bottom mechanism. I press the pedal gently making sure NOT to have your hand caught anywhere. It may not be the safest way so please be careful. I find that it's the only way to view the moving parts and to oil it. This is also a good time to inspect the belt for wear and tear. 

Now, you are ready to close the machine and place it in it's original sewing position. Here's the fun part... put your pedal to the metal and make it run for a few seconds at maximum speed... it should PURR!

I leave my well oiled machine over nite, it seems to like it and the next day I use a scrap piece of fabric to start with. THERE WILL BE SOME OIL RESIDUE.

I've been cleaning and oiling my machine this same way for many, many years. I guess I'm doing something right, because my machine is working as if it's brand new.

So keep on sewing and enjoy a clean and well oiled Fashion Mate 257!


Monday, May 14, 2012

Singing The Fashion Mate!

From a 1935 Singer Ad.


I want to thank everyone for sharing their wonderful Fashion Mate stories. Love the comments and please keep them coming.

In my next post, I'm planning a, 'How to maintain and keep alive your Fashion Mate.' It will be lengthy so I'll divide it into parts!

Stay tune!

Monday, April 23, 2012

Lace 2 Ways

Project #3,
Orange Shawl


This is not the first time I've knitted this pattern...


I enjoy this pattern so much that I knitted two pieces that sold at the last Christmas Make It Show. Now, this is project 3 and 4.


As I rummaged through my yarn stash I found this rich orange fingering wool. Right away, I wanted to make this lace shawl. 


Shawl or scarf!


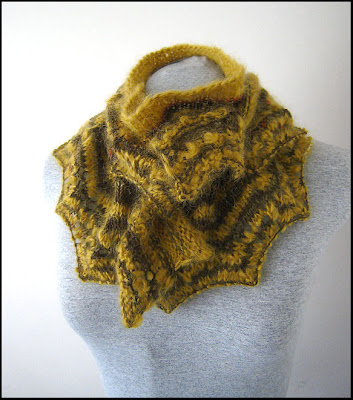
I was having so much fun, I knitted this shawl in no time. Call it warp speed. So, back to the yarn stash and I discovered a left-over of a yellow/gold mohair. Not quite enough to make anything, but it would work well together with another left-over yarn I had.

I'm very happy to see how the colors mixed and how the textures work well together. Finishing it with a few rolls of just mohair completes this beautiful ready to wear, luxurious scarf!

These two will be on sale at the next Make It Show in November!


Project #4,
Mohair mixed with a 
fingering yarn worn as scarf...


worn as shawl.

Saturday, April 7, 2012

Kamut/Flax Bread for Roubaix Sunday.

My Kamut/Flax Bread, Yum!


Our friend, Duane, gave us a supply of organic kamut grain and I decided use it in my bread recipe.

Kamut is higher in potassium and protein over wheat flour and I added flax seeds to further fortify it. I made it so Richard and I can enjoy toast with plenty of coffee for Sunday's early wake up call (5 AM) for the Paris-Roubaix classic race!


The famous Arenberg Forest quietly waits!

Tuesday, April 3, 2012

Singer Fashion Mate 257 Free Manual

This is the fun cover to the Fashion Mate 257 cover.

When I first wrote this post on my Fashion Mate 257, I would never have guess how popular this post has become. I'm amazed that I'm still getting comments, since posting the article way back in 2009.

I know I had the manual during my Fashion College days, in my twenties. Somewhere between that time and over twenty-five moves that brought me across Canada, it was lost. 

You can find this manual online for a price, but, why would you do that? When you can download it for FREE!

Here, directly from the Singer webpage is the Fashion Mate 257 manual...


I want to thank everyone for their comments and stories (don't stop it's so enjoyable to read the comments) and I'm so excited that you all are enjoying the Fashion Mate as much as I do!

Happy sewing!


Wednesday, March 28, 2012

Back... with a Red Pom Pom

I've decided to return ...and keep the Galstudio blog going!

I did not feel comfortable to keep the cooking and knitting adventures on the Red Dots Cycling Blog.

I'm happy to say that Galstudio will be my own personal blog... all things I also love to do. Looking back, this blog is like a journal of all my beautiful knit stuff. Often, it's hard to remember everything that I've made.

So this is my latest creation...

Simple Scarf with Red Pom Pom.


I discovered, from my stash, this thick 100% wool. Usually I prefer fingering yarn. But I happen to have this fabulous two-tone wool, I had to use it.

I didn't follow a pattern, I ad lib and created this scarf from a simple k1 p1 and finished with a point. It needed a little accent to make it more fun...

OMG, I haven't made pom pom's since grade six!

Off I went to make Pom Pom's. You can find how to make them online. I was stumped as to what size to make them. My first attempt was way too large, then I made them too small.

Third try ... this time right, I made them the right size. 

I love this design, a scarf I would wear. It will be going into my sale stock at the next winter craft show.


I'm very happy to be back sharing all my creative endeavors. In fact, I already cast on for a pair of socks... Stay tune!


Pom pom size matters!

Wednesday, January 25, 2012

Adieu Galstudio!


Galstudio has come to an end!

I'm happy with  a tinge of sadness. It has been a great journey but the reality is, to go further you must let go, to climb higher.

I'd like to THANK all my followers for all their comments and support. And, I invite you to follow me, on the new blog I'm sharing with my partner, Richard. I've decided to focus my energy on our new business and I will keep writing on my knitting, cooking and sewing machine adventures on the new blog.

This new blog will allow me to consolidate the business aspect with the personal side. Because it will be a joint blog, it will allow both of us to frequently keep the blog updated. Follow Richard and I on our new twitter page: twitter/reddotscycling

I invite you all to visit and read my adventures and misadventures, climbing to newer heights!

Heartfelt Thanks!